Monday, April 27, 2015

Woods Girl Weeks 1 & 2

This post is the first in a set of posts: Part 1Part 2
And if you liked this, here is a previous let's play with the Amazon!

Today, I am running the Woods Girl through the Magic Realm. The Woods Girl is an archer who plays similarly to the Elf, but with only the barest access to magic. Still, she can be formidable with her Light Bow and when played with her optional "Expert Woodcraft" rule, she can do some damage.


For the most part, I will be playing the base game. Only the following optional rules will be used: Serious Wounds, Watchful Natives, Expert Woodcraft, Birdsong Rearrangement, Persistent Chits. I am not particularly fond of the ambush rule, even though it benefits the Woods Girl quite a bit, so I am playing without it.

I choose to start at the Inn and I take Control Bats as my spell, though I don't assume I will get much use out of it, but we'll see. My VP assignment goes one point Fame, Notoriety and Gold, and though it is a terrible idea, two points in Great Treasures. Our Woods Girl is a Laura Croft wannabe!

Day 1

Here is our map:


It looks as though the Ruins and the Deep Woods are our best bets for early exploration, so we will get ourselves hidden and into the Ruins as soon as possible. I record one TRADE to see what the Rogues have in their dwelling, two HIDES, and then will MOVE into Ruins 2.


My trade with the Rogues reveals an interesting treasure. The Magic Spectacles might be useful to us, but we will need some cash to buy even this inexpensive treasure from the surly Rogues. I make a half-hearted attempt to charm the spectacles from the ne'er-do-wells, but I am rebuffed (no deal), so I skulk out of the inn and make my way to the Ruins.


My hide is successful, and I have uncovered the Hoard in Ruins 6, but two Heavy Trolls block my path. The trolls aren't particularly dangerous to the Woods Girl. They are heavy and armored, which poses a problem -- my bow does L** damage, but the trolls' armor means I need an additional level of damage to score a kill. Looking at the missile table, we see that I will need to roll a 1 or 2 to kill one of these beasts.


So, I am hidden and can take a free shot, but will then have to run back toward the Inn. I will probably have to do this for several days trying to get lucky enough to kill the trolls... all to get to the Hoard, which is a nice site, but it is stuck in a cave clearing. I think the Woods Girl will sneak past these trolls and investigate the Deep Woods.

(Note: This is where the ambush rules would have helped us greatly. Instead of having to flee after a single attack, we would have been able to hide after each shot, only being forced to flee when we failed a HIDE check. Oh well.)

Day 2

The Woods Girl leaves the trolls behind, heading into the Cursed Valley and then into the Deep Woods beyond. I record a MOVE first, to get out of the trolls' clearing, then two HIDES, and then a final MOVE into Deep Woods 2.


Honestly, that was a little underwhelming. The Deep Woods hold no treasure sites, only the promise of dragons and bats. It is definitely not worth hanging out here. I can get to the Ledges from here, or take a longer trip to either the Borderland, or the Cliff. I decide to head northwest to the Ledges on Day 3.

Day 3

Well crap! That stinks. The Ledges are a dead end, both in terms of their geography and their contents -- a few serpents slithering their way through piles of bones, no doubt the remains of former adventurers who were bored to death here!


We are going to have to head back, which is going to cost us at least three days. That Hoard is looking better by the day! But, there is still the Borderland and Cliff to check, so I am going to make my way back through the Deep Woods and try to get to one of those tiles.

The Plan

I am going to make a run for the Borderland. It will take 3 days, and I will have to brave the Ghosts, but they shouldn't be a problem. I will take a HIDE and three MOVES each day in hopes of getting there as soon as possible.

Days 4-6

My trek proves uneventful. I do spot some Heavy Flying Dragons circling the Deep Woods, but decide to avoid them. I also dodge the Ghosts. By the end of day 6, I am in the Borderland with Ruins C and the Cairns... once again stuck in a cave clearing.


The Woods Girl's Trek
Day 7

Again, I have the bad luck of finding a nice treasure location stuck in a cave clearing. And if the goblins show up... without the ambush rules in play, I will likely have to flee. I decide to have a look at the Cliff before mucking around in cave clearings. I make 4 MOVES and get to Awful Valley.

Day 8

I cautiously into the Cliff, hoping to find something worthwhile. I record two MOVES and two HIDES, ending my day in Cliff 3.


Excellent! I find the Lair and the Pool... surrounded by a bunch of nasty red sound chits, but even so, this is a nice find.

Day 9

We will HIDE and then SEARCH three times, hoping to find the Lair and grab some treasure.


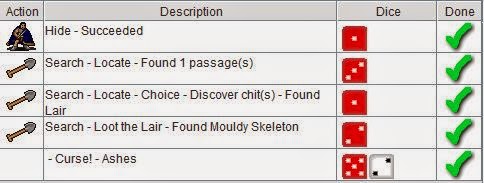
Interesting... we find the passage to the Pool, the Lair and the Mouldy Skeleton all in a single day! The Ashes curse is going to be highly annoying because the Chapel is a long way away... but still this is a good start.

In and of itself, the Mouldy Skeleton isn't too useful a find, since the three artifacts it adds to the treasure site (H helmet, breastplate and shield) are too heavy for the Woods Girl to use. However, they are added to the top of the treasure pile, pushing the rest of the cards down, making them easier to loot. That is a good thing and it means we should get a nice haul tomorrow.

Day 10

I am going to take advantage of our luck and try to get as much treasure out of this site as possible before having to fight or flee. I record one HIDE and three SEARCH phases.


And my luck turns. Even though it is a great treasure and counts toward my victory conditions, the Cloven Hoof adds one to all die rolls in the clearing, making my life just a little harder, and ruining any chance I have to kill the Armored Tremendous Dragon sure to appear. On the other hand, it is at least color magic, and so if a bat were to appear, I could use Control Bats to subdue it. Still, I'd rather not have that die roll penalty here, so I take the Cloven Hoof with the intention of dumping it somewhere safe.

Day 11

I record three MOVES and a HIDE, intending to move into the Awful Valley, drop the Cloven Hoof in one of the clearings there, and then get back to the Lair. Unfortunately, a Giant Bat has some other ideas.


Ugh... as you can see, a monster roll of 6 has brought all the bats to the tile. An unarmored, heavy creature is a 50/50 chance for the Woods Girl's bow, but if that fails, it is a slog -- the bat is fast enough to give the WG trouble and if it flips, she will not be able to run. Still, if she wants to get to the Lair, she is going to have to kill that bat.

Hidden, I am able to alert my bow to the L1** side. I am guaranteed to hit and a 3 or less on a single die will kill the bat. And... a 5. I hit, do light damage and unalert my bow. Now, we can either run and return tomorrow with the same strategy, or we can fight on, hoping to survive round 2 until we can ready our bow again.

I am 11 days in and I have killed nothing, and found very little. I am feeling a bit crappy about how this run has gone so far, I am going to risk it. The bat will kill me 1/3 of the time on round 2. If I survive, I have another shot at it.

I play a MOVE L2** to ensure I don't get undercut, and any FIGHT with no asterisks will do. Any box will do, too... but I am superstitious about putting my maneuver in the same box as an enemy I am trying to avoid, so I Duck.

Round 2

The bat does not change boxes, but he does flip. I miss and my bow alerts. I have to fatigue a MOVE L3* and we are onto round 3.

Unless the bat flips again, I can no longer run. However, I am alerted, so a FIGHT M5 will work as well as anything else. I play a MOVE L2** to ensure I don't get undercut if the bat flips, and my missile roll goes awry.

Round 3
Finally, I undercut the bat and roll a 1 on the missile table, skewering it!

Round 3 Result
All that work for 3 fame and notoriety. I fatigue another MOVE chit and we can move to the Lair tomorrow.

Day 12

I am hoping that another monster roll of 6 will hold off until day 14, when I can use Control Bats to fly them far, far away. In the meantime, my path to the Lair is clear. I record two HIDEs, a MOVE and a SEARCH, hoping to grab a little more loot.

I loot the Sacred Statue, but both hides fail and I am staring down the angry, flaring nostrils of the Tremendous Dragon. I flee... and need to reconsider my choice of treasure sites.

Day 13

Where to go? I do have a good chance of extracting one more treasure from the Lair, and if I can survive day 13, I might be able to figure out a good use of the bats on day 14. Otherwise, I need to find greener (and less dangerous) pastures and frankly, I am not sure where those would be. It seems the other treasure sites are locked away in caves or far away mountain clearings. I have already spent too much time running from tile to tile without gaining any victory points, so let's stick around one more day and see what happens.

So, I MOVE, HIDE, MOVE, SEARCH, hoping to sneak back into the Lair and swipe a treasure. Everything succeeds nicely, and I pull the Elven Slippers from the treasure pile. The Slippers are a nice treasure for the Woods Girl, giving her an L2 MOVE without any asterisks. I also manage to spawn the second Giant.

I could try to kill the Giant from hiding, and would do so on a 1 or 2. Then I would  have to flee the clearing, back into the Awful Valley. Of course, my ultimate goal is to be in a bat clearing on day 14, so I don't want to ruin that chance. Regardless of what I do, my ability to get to the bats is going to hinge on a single HIDE roll. I decide to take my shot at the Giant.

Alas, the missile roll is not with me, and my attack decreases 2 levels, and thuds harmlessly into the Giant's toe. I do little more than anger him... then run.

Day 14

As the second week comes to a close, I have Grey magic in every clearing. I am thinking that I could sneak past the Giant and the Dragon and end my day in the clearing with the Bats. I can cast Control Bats that evening and spend day 15 flying south to the Order to sell the Sacred Statue and get my Ashes curse removed. Still, that will leave me hurting for victory points. It might be prudent to stop in the Caves first to see if there is anything of interest there.

Nonetheless, I need to get to the Bats first, and that all hinges on a HIDE roll...

Success
Excellent! I get to the Bats, wait until evening, cast my spell and I am ready to fly! Tomorrow.

Tuesday, April 14, 2015

Magic Realm Combat 3 -- Luring with Natives

This is the first part of a larger tutorial:

Quick tutorial today... we are going to battle with some natives on our side and talk about luring, deploying and battling on multiple sheets. Like last post, I am going to use RealmSpeak to manage the fight, which will make it a little easier on me... at the expense of being able to control the rolls. We'll see how it goes.

For the first battle, we are going to pit the Black Knight against two Heavy Trolls. This is a pretty good fight for the BK, though I would expect him to take a hit or two if he starts the battle unhidden. With a hireling, we should fare a little better. Let's give the BK a rogue companion and see how we can use him.

One way we can use hirelings is to lure enemies onto their combat sheet, tricking the monsters into attacking them instead of us. Every hireling you have can lure a single enemy to his sheet each combat round. Having a native lure an enemy can save us wounds and fatigue, and to allow us to ignore our defense to play more aggressive attacks. The risk is that the native is killed in the process, which will cost us notoriety and keep us from our precious victory conditions.

The Black Knight vs. Two Heavy Trolls -- Round 1

Round 1 -- Luring Step
This is how we are going to use Rogue 7 in this battle -- he is going to step in and take the first troll off our hands, allowing us to play an extremely aggressive attack on the second troll. To do this, R7 lures the troll in the Luring step.

Round 1 -- The lured troll goes on R7's sheet, not ours
To lure the troll, we simply place him on our hireling's combat sheet. Notice that we flipped R7 to his dark side. When we lure an enemy onto a hireling's sheet, we can flip him to either side. Rogue 7 has a side with a M3* attack and a 5 speed move, and another side has an L4* attack with a 4 speed move. Neither of R7's sides has an attack that can kill a troll who is heavy and armored, so we are going to play the side with the better move speed so that R7 does not get undercut and killed.

Once R7 has lured one troll, the other is deployed to our sheet. (If there were other characters in the clearing, they might have gotten attacked by the troll in the Random Deploy step.) So, R7 has a troll, as does the Black Knight. We are still going to have to withstand an attack this round, so did the native really help at all?


He actually helped quite a bit. Because we only have a single troll to worry about, we can play a highly aggressive attack in an attempt to kill the troll before he can even attack us. The first step in this attack is to play a FIGHT chit to alert our trusty mace. Unfortunately, trolls are pretty quick and so to alert our weapon, we are going to have to burn our FIGHT M3** -- using all of our effort asterisks for this round!

No need to be alarmed though. We don't need any more effort asterisks to undercut and kill our troll. The mace is a speed 3 on its alerted side, so we can play our slowest FIGHT chit, as long as it has a Heavy strength, we will hit and do enough damage to kill the hapless troll. So, we play FIGHT H6, and a MOVE H6 and the Black Knight will kill his troll this round.

Round 1 -- Position Step, our sheet
As for Rogue 7, it is just a matter of not getting hit. His move speed of 4 is fast enough to not get undercut on either of the Heavy Troll's sides, so it really comes down to a 1/3 chance on a die roll to see if the troll intersects... in which case, the Rogue dies. So, in this case, it doesn't matter how we play the combatants on R7's sheet, he lives 2/3 of the time, and dies 1/3 of the time.

Round 1 -- Position Step, R7's sheet
We roll a 6 for the reposition roll, which moves the Heavy Troll from the Thrust box, into the Smash box, and he does not flip (rolled 1/5). Our hireling stays where he is and does not flip because he lured the monster onto his own sheet. When a native is battling on his own sheet, he does not roll to reposition, or to change tactics. We control where he is played and what side he is played on. Keep this in mind, because when we deploy the native to a creature's sheet, this will change. So, R7 stays in the Charge box and the troll misses.

We have to fatigue one FIGHT asterisk because we alerted our weapon with a FIGHT M3**. We choose a FIGHT M4* because it is useless in this particular battle.

Round 2

This round is even easier than the last one. We are going to follow the same basic plan in which R7 lures the troll onto his sheet.

Round 2 -- Luring the troll onto R7's sheet
This round is better than the last one because the Black Knight has no enemies on his sheet and so he can alert his mace with any FIGHT chit he has. We pick a FIGHT M5, alert our mace, choose the troll as our target, and move onto the Position step.

Round 2 -- Position Step, R7's sheet
Since he is targeting a creature on another character's sheet, the BK plays his position step on R7's sheet. If you are battling other players, you still play your moves on your own sheet, keeping your plays hidden from the others, but playing solo, on RealmSpeak, we actually play our move on R7's sheet.

Our exact positioning doesn't matter here, because we are going to undercut the Heavy Troll and kill him with a speed 3 attack. Since this is the second round of combat, our speed 3 is certain to go before the troll, and so this is an automatic kill.

Round 2 -- Results
Making good use of our hireling allowed our Black Knight to kill two heavy trolls by spending a single asterisk in fatigue. Could he have won that battle alone? Certainly, we could have even played our aggressive strategy, but it would have cost us 2 fatigued asterisks, a wound, and possibly a damaged or destroyed shield, or a damaged suit of armor... and Rogue 7 isn't even that cool a hireling!

And to keep the concept of hiding (from the previous post in this series) fresh in your head... if the BK and R7 started the combat hidden, can you think of how you would play the battle to kill both trolls and take no fatigue or damage?


Thursday, April 9, 2015

Expanding the Realm Part 2

In an earlier post, I mentioned that the code for RealmSpeak is on GitHub and that I would be trying to extend the code a bit. Well, I have been groping around the innards of RealmSpeak for a few days now, and I figured I would give you guys a little progress report.

My main goal right now is just to add some spells to the game. There are three main reasons to add spells. First, it is an easy way to experiment and see how the code works. Second, because I am a little tired of choosing the same 2-3 spells over and over depending on the character I play. Finally, I know that many players have talked about buffing the day spells that give an extra phase. Others think this is the worst kind of blasphemy ever spoken. I wanted to throw a couple of these spells in the game to see how they played and if they imbalanced the game, or if they turned these spells into first-class citizens.

So, how is it going? Pretty good overall. I mostly understand how spells work and I have added a few new ones. What have I added...

Fae Guard (III/Gold) -- You summon a tiny fairy to assist you in battle. The fairy has no attack, but a 1 move time, so it can distract enemies while you dispatch them, or flee.

Miracle (I/White) -- If cast on a native group with a fallen member, that member will be resurrected and the group will become FRIENDLY with you for the rest of the game. (This spell is from Jay Richardson)

Serpent Tongue (VIII/Any) -- Control serpents and vipers.

Spirit Guide (VII/Any) -- A spirit guides you through the realm, allowing you to use secret paths/passages, but you won't learn any of them.

Stone Gaze (II/Grey) -- Roll on the Petrify table (1-5 success, 6 fail) to turn a target creature into a statue. A statue has no attack, tremendous (armored) vulnerability, and a 6 move time.

Summon Aid (VI/Any) -- You pay 1 gold and summon a member of a friendly native group to assist you in combat. If the native dies, you lose a level of relationship with the group.

Vale Walker (VII/Any) -- You can "walk the woods", but only in valley tiles.

The new upgraded phase/day spells are these...

Blend Into Background X (II/Grey) -- Extra HIDE phase/day. Lasts until the target fails a HIDE roll.

Blazing Light X (IV/Purple) -- Extra phase in the caves. Can only be cast in a cave clearing and lasts until the target ends a phase in sunlight.

See Hidden Signs X (III/Gold) -- Extra SEARCH phase/day. Lasts until the target finds a path/passage, discovers a chit, or loots a treasure card.

I need to do some more play testing of these, and I am looking to add at least 4-6 more spells. Hopefully, I can get to a release-state soon.

Thursday, April 2, 2015

Magic Realm Combat Part 2 -- Weapon Speeds and Hiding

This is the first part of a larger tutorial:

Today we are going to run a couple quick battles with the White Knight. We will use the stalwart knight to focus on the concepts of weapon speeds, alerting, and hiding as they pertain to MR's combat system. We will also get a look at tremendous monsters and the special threat they pose.

So first, let's set up a meeting between the powerful, but slow White Knight and a lone giant. First, let's take a look at the White Knight and his chits.

The White Knight is a powerful fighter capable of taking down the toughest monsters in the Magic Realm. His chits are either heavy or tremendous, giving him the ability to do tremendous damage while wearing the best armor available. His main weaknesses are that he is slow, with speeds of 4-6, and that he tires easily.

In particular, notice his MOVE chits. The WK has only four of them, they are on the slow side and most have effort asterisks. Indeed, his best MOVE is a MOVE H4**, which guarantees having to fatigue a MOVE. When playing the White Knight, we need to end our fights quickly or face a slow death by wounds and fatigue!

Like the White Knight, the giant is a powerful, but ponderous combatant. His attack and move speeds are 5. He does heavy damage and has tremendous vulnerability... nothing too special so far.
However, because he is a tremendous monster, he does not have the normal light and dark sides of lesser denizens and he does not "change tactics" with a roll. Instead, whenever the giant hits us, he flips to his red side. This means that he has grabbed us. He cannot be lured from our sheet and if he hits us again, he kills instantly.

In addition, giants have a special club attack. The club is played on our sheet as though it were a second monster. We cannot attack it, but it can attack us. This means that the giant gets two shots at us each combat round. It also makes the tactic of covering our move less effective, since the giant still has a chance to hit us without getting hit by our covering attack.

We are set up for our first round of combat. Similar to our last tutorial, I am starting this battle with the WK unhidden and alone with the evil Giant. After positioning our attack and maneuver, our sheet looks like this.

Round 1 -- Position Step
Notice that we are playing our MOVE H5* to keep from being undercut by the Giant's attacks. We are also covering our move so that if his main attack hits us, we will hit him first (due to it being round 1 and our weapon is longer) and kill him. But... you might ask, why not play our FIGHT H4**, undercut the Giant's move and kill him automatically? The reason is our great sword and its horrible unalerted side.

The great sword does H* damage, which is nice. But its unalerted side has an attack time of 6. Anytime you use a weapon, its attack time supersedes the time on your FIGHT chit. Thus, it doesn't matter what speed FIGHT chit we play, as long as our sword is on its white side, we attack with the abysmal time of 6.

Our reposition roll is a 5, which moves every box down and to the right. Though the Giant does not roll to change tactics because he is tremendous, his club behaves like a normal creature and does roll. We roll a 2/3 and do not flip the club to it more disturbing T4 side.

Round 1 -- Results
The good news is that our weapon is now alerted, allowing us to play a faster FIGHT chit. Let's set up for round 2.

Round 2 -- Position

Now, we are playing our FIGHT H4**, which will undercut the Giant, do H* harm, and kill him. The only thing we are concerned about now is that darn club. If it flips, it becomes a T4 attack with a length of 8. Our attack time is 4 and the length of the great sword is 8... the attacks will hit at the same time. That won't kill us because of our armor, but a T attack will destroy the H armor and give us a wound -- quite a price for a single giant!

Round 2 -- Result
The reposition roll is a 3, which switches box 1 & 2. The club flips on a roll of 3/6 and you can see what happens. Our attack kills the Tremendous Giant, but his club hits at the exact same instant. Because the club's T harm is higher than our H armor, it shatters the armor. Because it is medium or greater, we take a wound.

So, we lost our armor and we have to wound a chit and fatigue a FIGHT because of the FIGHT H4**, but the Giant is no more.

Hiding Changes Everything

Let's fight the same battle with one simple difference. Let's have the White Knight start the battle hidden. If we are hidden at the start of the battle, we have to pay a little more attention to the first part of the combat sequence.

The first step in a combat round is the Luring step. This is where we lure creatures to our combat sheet, daring them to attack us. This makes us unhidden, so we don't lure and remain lurking in the bushes, waiting to strike.

The second step is the Random Assignment step. This step is where creatures that weren't lured in the previous step get randomly assigned to any unhidden characters in the fight. Since we are hidden, the giant cannot be assigned to our sheet.

The Deploy step will become important in later tutorials, when we have native hirelings. For the remainder of this tutorial, we will skip deployment.

This takes us to the Action step. During the Action step, we can take one of several actions, but most of the time our main choice here is to either run away, or alert our weapon. To run, we have to play a MOVE with a speed less than that of all the creatures on our sheet. Since we are hidden, there are no creatures on our sheet, so any MOVE chit will get us out of the battle.

But, that's not why we're here. We are going to alert our great sword. To do that, all we need to do is play any FIGHT chit with a speed less than the move speed of all the creatures on our sheet. Since there are no creatures on our sheet, we can play a FIGHT H6 and our weapon becomes red-side up.

(Note: Any chit you use to run or alert in the Action step gets put in the "Used this Round" box and counts toward your effort limit and for fatigue. Be careful that you don't play a tiring FIGHT chit to alert your weapon, only to not have enough effort left to not be killed later in the round.)

Now, I have alerted my great sword, cancelling its big flaw. But it gets even better once we get to the Position step!

Round 1 -- Position
Because I didn't lure the Giant, and he didn't get assigned to me randomly, he isn't on my sheet. In the Assignment phase, I can target him (which makes me unhidden), but he hasn't targeted me. Attacking from a hidden position gives you one free shot against the monsters.

Round 2 -- Result
So, with an alerted weapon, and no incoming club attack, I can play my FIGHT H4**, undercut the Giant and kill him automatically without the possibility of wounds or damage to my armor. Starting unhidden, the Giant has a chance to get one or two ugly shots on me. Starting hidden, the Giant is an easy kill.

The Troll and the Morning Star


For our second battle, we are going to pit the White Knight against the Tremendous Troll. The troll is a pretty scary foe for the White Knight because, although he lacks the extra club attack, he is faster than the Giant. Fast opponents are the White Knight's bane.

In fact, if we think about what is going to happen, this is an awful combat for the White Knight. Let's set up for round 1 and we'll see why.

Let's say we try to play defensively and play MOVE H4** and cover with a FIGHT H6. Our covering attack will hit the Troll before he hits us, but we can't kill the Troll this way. The Tremendous Troll has a tremendous vulnerability and to add to that, he is also armored. (Trolls, Serpents, Vipers and Dragons are all armored.) This means that our attack will have one sharpness star removed when we calculate harm.

So, our H* attack becomes an H attack, which does nothing but annoy the Tremendous Troll. We could play a tremendous FIGHT chit, but all of our T FIGHTs have asterisks, which means we cannot play our MOVE H4**, which means the Troll undercuts us. If we don't intercept the Troll on round 1, he undercuts us, goes red-side up and kills us on round 2.

Round 1 -- Position
If we started the battle hidden, we could run, but unhidden this is pretty much our best option. We have a 1/3 chance to kill the Troll with some armor damage and a wound. Otherwise, we are ripped to shreds.

Round 1 -- Result
Now the Troll is red-side up and with that attack time of 2, there is nothing we can do to save ourselves.

Round 2 -- Result
Let's take a quick look at the battle if we change the White Knight's weapon to a morning star. The morning star is slightly shorter than the great sword (length 6) and it loses one sharpness star. At first glance, that might make it seem inferior to the sword, but it has one huge advantage. Its alerted side has an attack time of 3. That doubles our chances of winning against the mighty Tremendous Troll.

Round 1 -- Position
Here we are playing our MOVE H4** and we are covering with a useless FIGHT H6. Similar to the great sword, we cannot kill the Troll with a FIGHT H, so why are we covering our move?

Well, if the Troll manages to intercept us (1/3 chance), we are dead in round 2, just like before. However, if the Troll misses us (2/3 chance), then we will miss him as well. Our weapon will then flip to its awesome speed 3 side. If we hit the Troll, our weapon does not flip, so we are covering our move to insure we miss the troll if he misses us.

Round 1 -- Result (everyone missed)
So, now what? Everyone missed and we have to fatigue a MOVE, which for the White Knight is a bad thing. But, because our weapon is now a speed 3, we are guaranteed to undercut the troll.

Round 2 -- Position
We play a FIGHT T5* and any MOVE. Our speed 3 attack will undercut the Troll and we will do tremendous harm and kill him. Because this is round 2, our attack speed determines the order in which the attacks are resolved, and we are fastest, so the Troll's counterattack (which would undercut us) is negated.

Round 2 -- Result

We win, because the morning star is awesome. This is why after-action reports with the White Knight often start with him trading with the Order to swap his great sword for a morning star. The alerted 3 speed is that much better than an extra sharpness star.

Still, even with a morning star, there is a 1/3 chance of dying, and a 1/3 chance of death is a little harsh. However, if you start the battle hidden, it becomes trivial if you start it hidden. Starting hidden, allows you to alert the morning star during your Action step, and devastate the Troll with a speed 3, tremendous harm attack without him even getting to target you.

Next installment, we will bring some hirelings along and see how that goes.